Weixin Service

 DouYin
 KuaiShou

Identification and selection of electronic components these detection methods are very effective
Date:2021-11-22 13:03:36 Views:2928
Nowadays, the volume and weight of electronic products are shrinking, the products are becoming more and more diversified, the technical content is expanding, and the degree of intelligence is greatly improved. The reliability requirements for electronic products have become an important index to measure the quality of electronic products. A large number of various types of electronic components are used in electronic equipment, Equipment failures are mostly caused by the failure or damage of electronic components. Therefore, how to correctly detect electronic components is particularly important, which is also a skill that electronic maintenance personnel must master.
Basic principles of component selection:
(1) Universality principle: if the selected components are widely used and verified, try to use less popular and partial gate chips to reduce development risks.
(2) Principle of high cost performance: when the function, performance and utilization rate are similar, try to select components with better price to reduce the cost.
(3) Principle of convenient procurement: try to choose components that are easy to buy and short supply cycle.
(4) Principle of sustainable development: try to select components that will not stop production within a foreseeable time.
(5) Principle of substitutability: try to select components with more pin to pin compatible chip brands.
(6) Upward compatibility principle: try to select components used in previous old products.
(7) Resource saving principle: try to use all functions and pins of the upper element device.
The following is a selection of some common electronic component testing experience and skills accumulated in electrical maintenance for your reference.
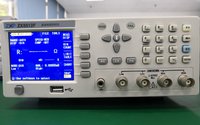
_20211122115959_731.jpg "电子元器件的识别与选用 这几个检测方法很有效")
1. Measure the polarity of each pin of rectifier bridge
Multimeter setting R × 1K gear, the black lead is connected to any pin of the bridge pile, and the red lead successively measures the other three pins. If the readings are infinite, the black lead is connected to the output positive pole of the bridge pile; If the reading is 4 ~ 10K Ω, the pin connected to the black lead is the output negative pole of the bridge stack, and the other two pins are the AC input terminal of the bridge stack.
2. Judge the quality of crystal oscillator
First use a multimeter (R × 10K block) measure the resistance value at both ends of the crystal oscillator. If it is infinite, it indicates that the crystal oscillator has no short circuit or leakage; Then insert the test pen into the mains socket, hold any pin of the crystal oscillator with your fingers, and touch the other pin with the metal part at the top of the test pen. If the neon bubble of the test pen is red, it indicates that the crystal oscillator is good; If the neon bubble is not bright, the crystal oscillator is damaged.
3. Unidirectional thyristor detection
R of available multimeter × 1K or R × Measure the forward and reverse resistance between any two poles at gear 100. If the resistance of a pair of poles is found to be low (100 Ω ~ LK Ω), then the black probe is connected to the control pole, the red probe is connected to the cathode and the other pole is anode.
The thyristor has three PN junctions. We can judge whether it is good or bad by measuring the forward and reverse resistance of PN junction. When measuring the resistance between control electrode (g) and cathode [C), if the forward and reverse resistance are zero or infinite, it indicates that the control electrode is short circuited or open circuit; when measuring the resistance between control electrode (g) and anode (a), the forward and reverse resistance readings should be large; when measuring the resistance between anode (a) and cathode (c), the forward and reverse resistance should be large.
4. Polarity identification of bidirectional thyristor
The bidirectional thyristor has main electrode 1, main electrode 2 and control electrode. If a multimeter R is used × The resistance between two main electrodes shall be measured at 1K gear, and the reading shall be approximately infinite, while the forward and reverse resistance readings between the control electrode and any main electrode are only tens of ohms. According to this characteristic, we can easily identify the control electrode of the bidirectional thyristor by measuring the resistance between the electrodes. When the black probe is connected to the main electrode 1. When the red probe is connected to the control electrode, the measured forward resistance is always smaller than the reverse resistance. Therefore, it is easy to identify the main electrode 1 and main electrode 2 by measuring the resistance.
5. Check the quality of the LED
Set the multimeter to r first × 10K or R × Block L00k, then connect the red probe with the "ground" lead out end of the nixie tube (taking the common cathode nixie tube as an example), and the black probe is connected with other lead out ends of the nixie tube in turn,
The seven sections shall be illuminated respectively, otherwise it indicates that the nixie tube is damaged.
6. Electrode for distinguishing Junction FET
Place the multimeter in R × 1K gear, use the black probe to contact the pin assumed to be grid g, and then use the red probe to contact the other two pins respectively. If the resistance values are relatively small (5 ~ 10 Ω), exchange the red and black probes for measurement once. If the resistance values are large (∞), it indicates that they are reverse resistance (PN junction reverse), belonging to n-channel tube, and the pin contacted by the black probe is grid g, which indicates that the original assumption is correct. If the resistance values measured again are very small, it indicates that it is a positive resistance, belonging to p-channel FET, and the black probe is also connected to grid G. If the above situation does not occur, the red and black probes can be replaced and tested according to the above method until the grid is judged. Generally, the source and drain of Junction FET are symmetrical during manufacturing. Therefore, when the grid G is determined, it is not necessary to distinguish the source s and drain D, because the two electrodes can be used interchangeably. The resistance between source and drain is thousands of ohms.
7. Discrimination of triode electrode
For a transistor with unclear or unmarked model, in order to distinguish their three electrodes, it can also be tested with a multimeter. First turn the multimeter range switch to R × 100 or R × 1K resistance block. The red probe arbitrarily contacts one electrode of the triode, and the black probe successively contacts the other two electrodes to measure the resistance between them. If the measured resistance is hundreds of ohms, the electrode contacted by the red probe is base B, and the tube is PNP tube.
If a high resistance of tens to hundreds of kiloohms is measured, the electrode contacted by the red probe is also the base B, and this tube is an NPN tube.
On the basis of distinguishing the tube type and base B, the collector is determined by using the principle that the forward current amplification coefficient of triode is greater than the reverse current amplification coefficient. Arbitrarily assume that one electrode is C pole and the other electrode is e pole. Turn the multimeter range switch to R × 1K resistance block. For PNP tube, connect the red probe to pole C and the black probe to pole e, and then pinch the poles B and C of the tube at the same time, but do not make the poles B and C collide directly to measure a certain resistance value.
Then adjust the two probes for the second measurement, and compare the resistance measured twice. For PNP tube, the electrode connected to the red probe is the collector. For the primary with small resistance value of NPN tube, the electrode connected to the black probe is the collector.
8. Judgment of potentiometer
First measure the nominal resistance of the potentiometer. Use the ohmic block of the multimeter to measure both ends of "1" and "3" (set the "2" end as the movable contact), and its reading should be the nominal value of the potentiometer. If the pointer of the multimeter does not move, the resistance value does not move or the resistance value is much different, it indicates that the potentiometer has been damaged. Then check whether the movable arm of the potentiometer is in good contact with the resistor. Use the ohm block of the multimeter to measure both ends of "1", "2" or "2" and "3", turn the rotating shaft of the potentiometer counterclockwise to the position close to "off". At this time, the resistance should be as small as possible, and then slowly rotate the shaft handle clockwise. The resistance should gradually increase. When it is rotated to the extreme position, the resistance value should be close to the nominal value of the potentiometer. For example, during the rotation of the shaft handle of the potentiometer, the pointer of the multimeter has a jumping image, and the contact of the "moving contact" point is poor.
9. Measure the leakage resistance of large capacitance
Place the 500 Multimeter in R × 10 or R × Gear 100. When the pointer points to the maximum value, immediately use R × 1K gear measurement, the pointer will be stable in a short time, so as to read the leakage resistance value.
10. Identify infrared receiver pin
Multimeter setting R × 1K gear, first assume that a pin of the receiving head is the grounding terminal, connect it with the black lead, measure the resistance of the other two pins with the red lead respectively, and compare the resistance values measured twice (generally in the range of 4 ~ 7K q). For the one with small resistance, the red lead is connected to the + 5V power pin, and the other with large resistance is the signal pin. On the contrary, if the red lead is connected to the known anchor and the black lead is used to measure the known power pin and signal pin respectively, the resistance value is above 15K Ω, the pin with small resistance value is the + 5V end, and the pin with large resistance value is the signal end. If the measurement result conforms to the above resistance value, it can be judged that the receiving head is intact.
11. Judging the polarity of unsigned electrolytic capacitor
First discharge the capacitor in a short circuit, then mark the two leads a and B, and set the multimeter to R × 100 or R × 1K gear, the black probe is connected to lead a, and the red probe is connected to lead B. read after the pointer is stationary, and short-circuit discharge after measurement; Then connect the black lead to lead B and the red lead to lead A. compare the readings twice. The primary black lead with large resistance is connected to the positive pole and the red lead is connected to the negative pole.
12. Measuring light emitting diode
Take an electrolytic capacitor with a capacity greater than 100 "f (the larger the capacity is, the more obvious the phenomenon is), and use the multimeter r first × Charge it at gear 100. The black probe is connected to the positive pole of the capacitor and the red probe is connected to the negative pole. After charging, the black probe is connected to the negative pole of the capacitor, and the measured LED is connected between the red probe and the positive pole of the capacitor. If the LED turns on and turns off gradually, it indicates that it is good. At this time, the red probe is connected to the negative pole of the LED, and the positive pole of the capacitor is connected to the positive pole of the LED. If the LED does not light up, switch its two ends and reconnect it for test. If it does not light up, it indicates that the LED has been damaged.
13. Optocoupler detection
Resistance R is selected for multimeter × Gear 100, do not select R × 10K gear to prevent high battery voltage from breakdown of LED. Connect the red and black probes to the input terminal and measure the forward and reverse resistance. Normally, the forward resistance is tens of ohms and the reverse resistance is thousands to tens of thousands of ohms. If the forward and reverse resistances are similar, it indicates that the LED has been damaged. Multimeter selection resistance R × First gear. The red and black probes are connected to the output terminal to measure the forward and reverse resistance, which is close to ∞ under normal conditions, otherwise it will be damaged by the light tube. Multimeter selection resistance R × In gear 10, the red and black probes are respectively connected to the input and output ends to measure the insulation resistance between the light emitting tube and the light receiving tube (if possible, the insulation resistance shall be measured with a megger. At this time, the rated output voltage of the megger shall be slightly lower than the withstand voltage value allowed by the tested optocoupler), and the insulation resistance between the light emitting tube and the light receiving tube shall be ∞ normally.
14. Detection of photosensitive resistance
Turn the multimeter to R during detection × 1K Ω block, keep the light receiving surface of the photoresist perpendicular to the incident light, so the resistance directly measured on the multimeter is the bright resistance. Then put the photoresist in a completely dark place. At this time, the resistance measured by the multimeter is the dark resistance. If the bright resistance is thousands to tens of thousands of ohms and the dark resistance is several to tens of megaohms, it shows that the photosensitive resistance is good.
15. Laser diode damage discrimination
Remove the laser diode and measure its resistance. Under normal conditions, the reverse resistance should be infinite and the forward resistance should be 20K Ω ~ 40K Ω.
If the measured forward resistance has exceeded 50K Ω, the performance of the laser diode has decreased; If its forward resistance has exceeded 90K Ω, it indicates that the tube has been damaged and can no longer be used.
The above is the related content of "testing methods of electronic components" brought by the core creation test. I hope it can be helpful to you. We will bring more wonderful content in the later stage. The company's testing services cover: electronic component testing and verification, IC authenticity identification, product design and material selection, failure analysis, function testing, factory incoming material inspection, tape braiding and other testing items. Welcome to call Chuangxin testing, we will serve you wholeheartedly.