Sharing of various diode testing methods for electronic component testing
Date:2022-11-15 16:29:32 Views:2280
As the most basic transistor, diode is ubiquitous in electronic circuit applications. Whether it is level conversion circuit, automatic power switching circuit, anti reverse connection circuit, there is the shadow of diode. In order to help you understand deeply, this article will summarize the relevant knowledge of various diode detection methods. If you are interested in the content to be covered in this article, please read on.
General diode is a semiconductor device formed by a PN structure, which has unidirectional conductivity. By measuring the forward and reverse resistance values with a multimeter, the electrode of the diode can be identified and whether the diode is damaged can be estimated.
1. Polarity judgment Set the multimeter to R × 100 or R × In 1k gear, the two probes are connected to two electrodes of the diode respectively. After measuring a result, exchange the two probes and then measure a result. In the results of the two measurements, the resistance measured once is large (reverse resistance) and the resistance measured once is small (positive resistance). In a measurement with small resistance, the black probe is connected to the positive pole of the diode, and the red probe is connected to the negative pole of the diode.
2. Detection and judgment of single negative conductivity Generally, the forward resistance of germanium diode is about 1kQ, and the reverse resistance is about 300. The resistance value of silicon diode is about 5kN, and the reverse resistance value is ∞ (infinity). The smaller the forward resistance is, the better the reverse resistance is. The greater the difference between the forward and reverse resistance values, the better the unidirectional conductivity of the diode.
If the measured forward and reverse resistance values of the diode are close to 0 or the resistance value is small, it means that the diode has been broken down, short circuited or damaged due to leakage. If the measured forward and reverse resistance values of the diode are infinite, it means that the diode is open and damaged.
3. The reverse breakdown voltage (withstand voltage value) of the detection diode of the reverse breakdown voltage can be measured with the transistor DC parameter test table. The method is as follows: when measuring the diode, set the "NPN/PNP" selection key of the test meter to NPN status, then connect the positive pole of the diode to the "C" socket of the test meter, and insert the negative pole into the "e" socket of the test meter, Then press the "V (BR)" key, and the test meter can indicate the reverse breakdown voltage of the diode. You can also use a megger and multimeter to measure the reverse breakdown voltage of the diode. During the measurement, the negative pole of the diode to be measured is connected to the positive pole of the megger, and the positive pole of the diode is connected to the negative pole of the megger. At the same time, use a multimeter (placed at a suitable DC voltage range) to monitor the voltage at both ends of the diode. Shake the handle of the megger (It should be gradually increased slowly). When the voltage at both ends of the diode is stable and does not rise any more, this voltage value is the reverse breakdown voltage of the diode.
_20221115162854_153.jpg)
Detection of zener diode
1. Discrimination of positive and negative electrodes From the appearance, the positive end of the metal encapsulated zener diode tube is planar, and the negative end is semicircular. One end of the plastic sealed zener diode printed with color mark is the negative pole, and the other end is the positive pole. For the voltage stabilizing diode with unclear mark, its polarity can also be determined with a multimeter. The measurement method is the same as that of ordinary diode, that is, use a multimeter R × For gear 1k, connect the two probes to the two electrodes of the voltage stabilizer tube, measure one result, and then adjust the two probes for measurement. In the two measurements, when the resistance is smaller, the black probe is connected to the positive pole of the voltage regulator diode, and the red probe is connected to the negative pole of the voltage regulator diode. If the measured forward and reverse resistances of the zener diode are very small or infinite, it means that the diode has been broken down or open circuit damaged.
2. The voltage stabilizing value is measured by 0~30V continuously adjustable DC power supply. For the voltage stabilizing diode below 13V, the output voltage of the voltage stabilizing power supply can be adjusted to 15V, and the positive pole of the power supply is connected to the negative pole of the voltage stabilizing diode after a 1.5k current limiting resistor is connected in series,
The negative pole of the power supply is connected to the positive pole of the zener diode, and then the multimeter is used to measure the voltage at both ends of the zener diode. The measured reading is the voltage stabilized value of the zener diode. If voltage stabilization II_ If the voltage stabilizing value of the electrode tube is higher than 15V, the voltage stabilizing power supply should be adjusted to more than 20V. A megger below 1000V can also be used to provide a test power supply for the zener diode. The method is as follows: connect the positive end of the megger to the negative end of the voltage stabilizing diode, and after the negative end of the megger is connected to the positive end of the voltage stabilizing diode, shake the handle of the megger at a constant speed as required, and monitor the voltage value at both ends of the voltage stabilizing diode with a multimeter (the voltage range of the multimeter shall be determined according to the stable voltage value). When the indicated voltage of the multimeter is stable, this voltage value is the stable voltage value of the voltage stabilizing diode. If the stable voltage of the voltage regulator diode is measured to be high or low, the diode's performance is unstable.
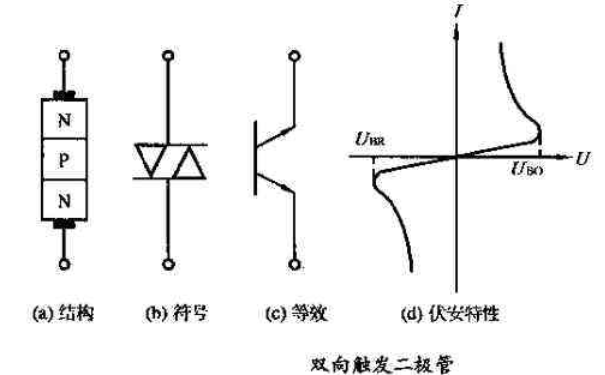
Detection of bidirectional trigger diode
1. Multimeter R for measuring forward and reverse resistance × 1k or R × 10k gear, measure the forward and reverse resistance of two-way trigger diode. Under normal conditions, the forward and reverse resistance values shall be infinite. If the measured forward and reverse resistance values are very small or 0, it means that the diode has been broken down.
2. There are three methods to measure the transition voltage of bidirectional trigger diode.
The first method is to connect the positive pole (E) and negative pole (L) of the tramegger to both ends of the bidirectional trigger diode respectively, use the tramegger to provide the breakdown voltage, and use the DC voltage range of the multimeter to measure the voltage value. After the two poles of the bidirectional trigger diode are switched, measure again. Compare the deviation of the two measured voltage values (generally 3-6V). The smaller the deviation value, the better the performance of this diode.
The second method is: first measure the mains voltage U with a multimeter, then connect the measured two-way trigger diode in series with the AC voltage measurement circuit of the multimeter, connect the mains voltage, read the voltage U1, and then connect the two-way trigger diode 2_ After the two poles of the transistor are connected, read out the voltage U2.
If the voltage values of U1 and U2 are the same, but different from those of U, it indicates that the conductivity of the bidirectional trigger diode is symmetrical. If the voltage difference between U1 and U2 is large, it indicates that the conductivity of the bidirectional trigger diode is asymmetric. If the voltage values of U1 and U2 are the same as those of the mains supply U, it means that the two-way trigger diode has been short circuited and damaged internally. If the voltage values of U1 and U2 are both 0V, it means that the two-way trigger -- the inside of the electrode tube is open and damaged.
The third method is to use 0~50V continuously adjustable DC power supply, connect the positive pole of the power supply in series with a 20kQ resistor and then connect it to one end of the bidirectional trigger diode, connect the negative pole of the power supply in series with the multimeter current gear (place it at 1mA gear) and then connect it to the other end of the bidirectional trigger diode. Gradually increase the power supply voltage. When the pointer of the ammeter swings significantly (more than tens of microamps), it means that the two-way trigger diode is on. At this time, the voltage value of the power supply is the turning voltage of the two-way trigger diode.
The above is the relevant content of "various diode detection methods" brought by this core creation test. I hope it can be helpful to everyone, and we will bring more wonderful content later. The company's testing services cover: testing and verification of electronic components, IC authenticity identification, product design material selection, failure analysis, functional testing, factory incoming material inspection, tape weaving and other test items. Welcome to call Chuangxin Testing, we will serve you wholeheartedly.


 Weixin Service

 DouYin
 KuaiShou


